How to use wiringPi?
Intro
This document introduces the basic usage and API of wiringpi with examples.
Wiringpi is a package made to control gpio 40pin with C in Raspberry Pi.

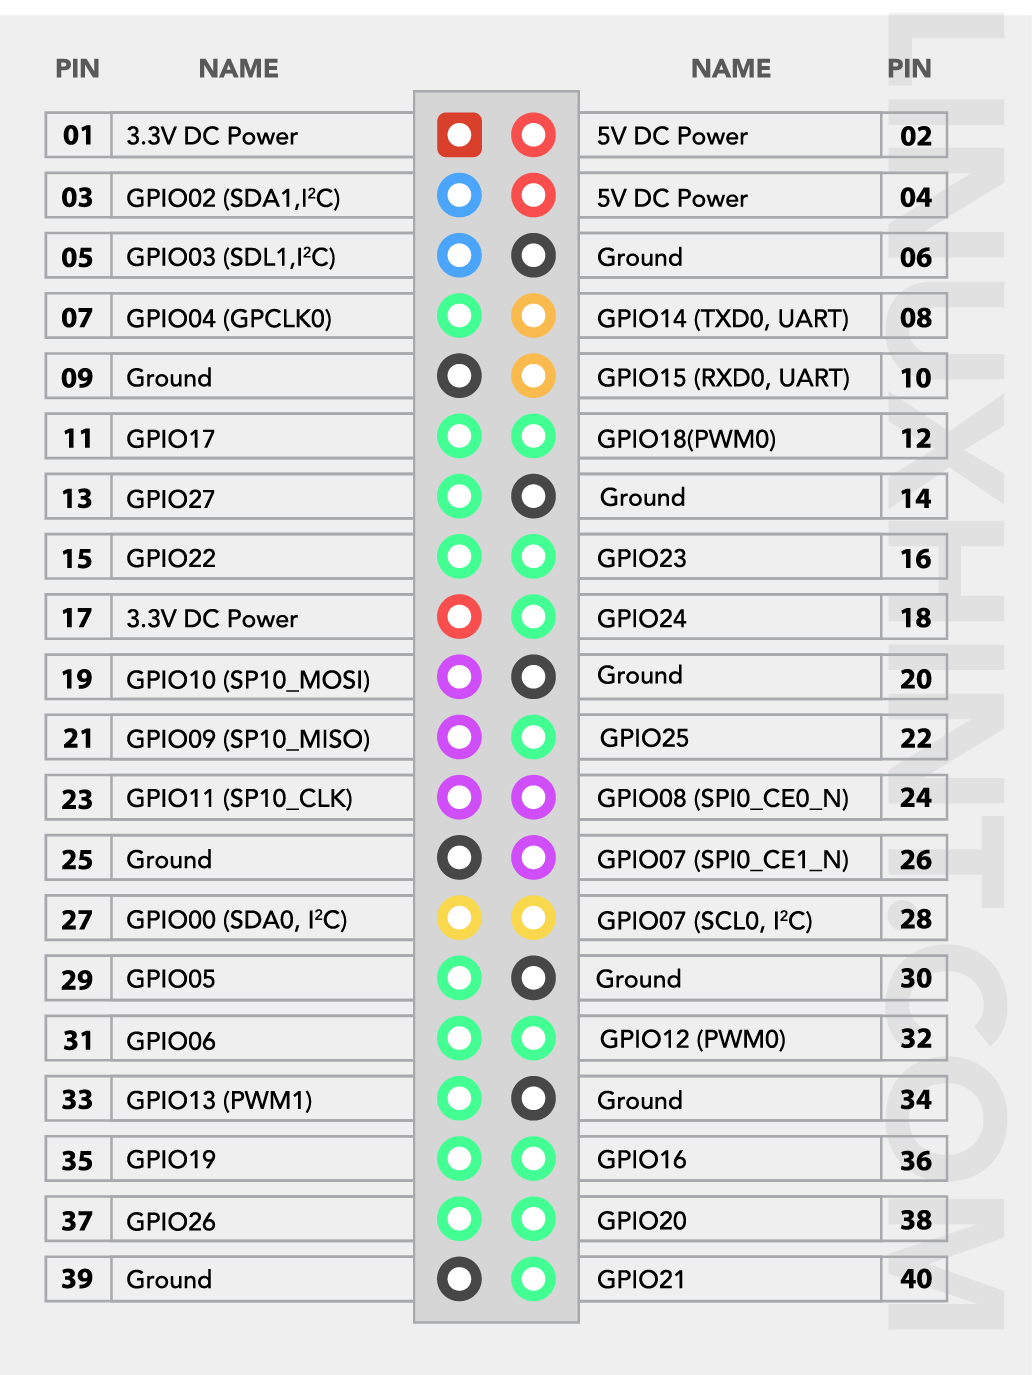
[picture 1] gpio header
Usage
install wiringPi
After boot Raspberry, Install package (git code)
$ git clone https://github.com/WiringPi/WiringPi.git
$ cd WiringPi
$ ./build
Version Check
$ gpio -v
GPIO readall
$ gpio readall
 +-----+-----+---------+------+---+---Pi 4b--+---+------+---------+-----+-----+
 | BCM | wPi |   Name  | Mode | V | Physical | V | Mode |  Name   | wPi | BCM |
 +-----+-----+---------+------+---+----++----+---+------+---------+-----+-----+
 |     |     |    3.3V |      |   |  1 || 2  |   |      | 5V      |     |     |
 |   2 |   8 |   SDA.1 |   IN | 1 |  3 || 4  |   |      | 5V      |     |     |
 |   3 |   9 |   SCL.1 |   IN | 1 |  5 || 6  |   |      | 0V      |     |     |
 |   4 |   7 |  GPIO.7 |   IN | 1 |  7 || 8  | 1 | IN   | TxD     | 15  | 14  |
 |     |     |      0V |      |   |  9 || 10 | 1 | IN   | RxD     | 16  | 15  |
 |  17 |   0 |  GPIO.0 |   IN | 0 | 11 || 12 | 0 | IN   | GPIO.1  | 1   | 18  |
 |  27 |   2 |  GPIO.2 |   IN | 0 | 13 || 14 |   |      | 0V      |     |     |
 |  22 |   3 |  GPIO.3 |   IN | 0 | 15 || 16 | 0 | IN   | GPIO.4  | 4   | 23  |
 |     |     |    3.3V |      |   | 17 || 18 | 0 | IN   | GPIO.5  | 5   | 24  |
 |  10 |  12 |    MOSI |   IN | 0 | 19 || 20 |   |      | 0V      |     |     |
 |   9 |  13 |    MISO |   IN | 0 | 21 || 22 | 0 | IN   | GPIO.6  | 6   | 25  |
 |  11 |  14 |    SLCK |   IN | 0 | 23 || 24 | 1 | IN   | CE0     | 10  | 8   |
 |     |     |      0V |      |   | 25 || 26 | 1 | IN   | CE1     | 11  | 7   |
 |   0 |  30 |   SDA.0 |   IN | 1 | 27 || 28 | 1 | IN   | SCL.0   | 31  | 1   |
 |   5 |  21 | GPIO.21 |   IN | 1 | 29 || 30 |   |      | 0V      |     |     |
 |   6 |  22 | GPIO.22 |   IN | 1 | 31 || 32 | 0 | IN   | GPIO.26 | 26  | 12  |
 |  13 |  23 | GPIO.23 |   IN | 0 | 33 || 34 |   |      | 0V      |     |     |
 |  19 |  24 | GPIO.24 |   IN | 0 | 35 || 36 | 0 | IN   | GPIO.27 | 27  | 16  |
 |  26 |  25 | GPIO.25 |   IN | 0 | 37 || 38 | 0 | IN   | GPIO.28 | 28  | 20  |
 |     |     |      0V |      |   | 39 || 40 | 0 | IN   | GPIO.29 | 29  | 21  |
 +-----+-----+---------+------+---+----++----+---+------+---------+-----+-----+
 | BCM | wPi |   Name  | Mode | V | Physical | V | Mode |  Name   | wPi | BCM |
 +-----+-----+---------+------+---+---Pi 4b--+---+------+---------+-----+-----+
compile
option 1
$ gcc -o main main.c -lwiringPi
option 2
$ gcc -o main main.c -lwiringPi -lwiringPiDev -lm -lpthread -lrt -lcrypt
API
wiringpi supports a number of APIs.
I only cover some of the most commonly used functions.
| Mode | function |
|---|---|
| map | physPinToGpio |
| map | wpiPinToGpio |
| ADC | analogRead |
| ADC | analogWrite |
| GPIO | digitalRead |
| GPIO | digitalWrite |
| GPIO | pinMode |
| I2C | wiringPiI2CRead |
| I2C | wiringPiI2CSetup |
| I2C | wiringPiI2CWrite |
| PWM | pwmSetClock |
| PWM | pwmSetMode |
| PWM | pwmSetRange |
| PWM | pwmWrite |
| SPI | wiringPiSPIDataRW |
| SPI | wiringPiSPIGetFd |
| SPI | wiringPiSPISetMode |
| SPI | wiringPiSPISetup |
| … | … |
Bold text will be covered in detail in the wiringPi code part.
test code
This is test code.
Connect wpi pin 0 and 1. (phys pin #11 and #12)
#include <wiringPi.h>
#include <stdio.h>

#define PINR 0
#define PINW 1

int main()
{
    wiringPiSetup();
    pinMode(PINR, INPUT);
    pinMode(PINW, OUTPUT);

    while (1) {
      digitalWrite(PINR, HIGH);
      printf("pin %d status: %d\n", PINR, digitalRead(PINR));
      delay(500);
      digitalWrite(PINW, LOW);
      printf("pin %d status: %d\n", PINR, digitalRead(PINR));
      delay(500);
    }
}
